Photoshop comes with Image Ready included, and that's what I use to animate my dolls. For this tutorial, we'll be covering how to do sparkles. Remember that the techniques learned here can be applied to anything else. What I mean is that you don't have to limit yourself to doing just sparkles, the same technique can be applied to other things as well, all you have to do is play around and see what you come up with. Anyway, let's get started!
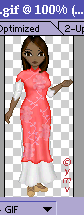 Open up the doll you want to animate. I advise you to wait until you have a finished doll, making the sparkles the finishing touch. This doll is done on a base by Amy of Xandorra's Place.
Make sure that your Layers and animation palette are open. You can open them by going to: Windows--> Show Layers/ Windows-->Show Animation. Make sure the layers palette says Layer 1.
 On the animation palette, click on the button shown at left. This creates a new frame. Now go to the layers palette, and make a new layer. TIP: I do this by clicking Shift, Ctrl and n at the same time. You can also go to Layer--> New Layer. You should now have two frames, and two layers. IMPORTANT: On the first frame, the second layer should be hidden (no eye next to it).
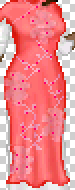 Now I suggest zooming in so you can see better. We are going to put sparkles on the floral design of the dress. So that the sparkles are visible, we pick a color darker than the original color and start to put it in random places. This must really be random, don't think too much about it, just put dots 1 pixel in size with the pencil tool where ever you want.
We keep doing the same thing throught. Make another new frame, and another new layer, and make sure you hide the previous layer. For example. On frame 3, I have 3 layers, I hide layer 2, keep layer 1 (that's where the doll is) and layer 3 (where I'm going to put more sparkles).
TIP: I actually keep all the layers open unitl the end, so I know where I previously put dots and don't repeat the pattern. You can test how it looks by click on the Play button on the animation palette.
Now I suggest zooming in so you can see better. We are going to put sparkles on the floral design of the dress. So that the sparkles are visible, we pick a color darker than the original color and start to put it in random places. This must really be random, don't think too much about it, just put dots 1 pixel in size with the pencil tool where ever you want.
We keep doing the same thing throught. Make another new frame, and another new layer, and make sure you hide the previous layer. For example. On frame 3, I have 3 layers, I hide layer 2, keep layer 1 (that's where the doll is) and layer 3 (where I'm going to put more sparkles).
TIP: I actually keep all the layers open unitl the end, so I know where I previously put dots and don't repeat the pattern. You can test how it looks by click on the Play button on the animation palette.
You can stop at 3 frames if you want, but I suggest that you continue on with up to 6 frames, with different colors.
Finishing touches: In the animations palette, make sure instead of once you have picked forever, and that you chose the time interval that is right for you. I have chosen to start the first frame with No delay and all the other frames with 0.1 seconds.
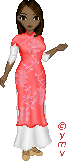
Here are my finished dolls, both done using this technique:

Final tip: You may, if you want, download both of these dolls (right click, and save as) and open them up in Image Ready and study how I did them. You may only do this for learning purposes. You may not, under any circunstances, copy the dolls, or change them or edit them and then claim them as your own. You may only download them so you can see how it works, not to use as a shortcut and copy/paste the animation or to frakendoll.
That said, I hope this tutorial was helpful to you, if you have any questions don't hesitate to ask (email: tiranaki@addr.com) or post it in my guestbook, or in the forum (link to the left in the main nav menu). As usual, spammers, and hate email, or "This sucks" will be deleted and will receive no reply.
This tutorial is © Yelitza M. Velez and may not be used without permission. It may not be downloaded and posted as someone else's work other than the authors. Please respect my copyrights. Base credit: Amy Roberts of Xandorra's Place.