::Plaid Skirt::
| Disclaimer:If you use PaintShop Pro you might want to check out Amy Robert's Plaid Skirt tutorials here. However, I warn you that the results are different and that this tutorial was written entirely on my own and is in no way affiliated to her plaid skirt tutorial, unlike some of my other tuts. Even though Amy features a nice technique, I found that it wasn't to my liking and decided to try it a different way. That said, I wore plaid skirts for high school, so I'm not too partial to them (read: uniform) but they seem pretty popular now days, so what the heck. PS. You might also want to check out Kelley Erin's Plaid Skirt tutorial, it's pretty good and easy to follow, and great if you use Ms Paint. | ||
 |  |  |
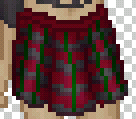
| 1.Since we are adding a skirt, I',m going to assume that you have already completed most of the doll, so on your doll, make a new layer and call it skirt or something equally descriptive. Draw the outline of the skirt. Remember that there are several different types of plaid skirts, if you want references, a good place is any manga or anime that features the Japanese schoolgirl uniform. I used my Anime and Game Characters vol. 3 book as reference. | 2.Use the paintbucket tool to fill in the outline with a color that is lighter than the outline color. | 3. Make a new layer and name it horizontal or something equally descriptive. Using the pencil tool at 2px, draw in a horizontal line with any color you choose, it's best if it compliments the main skirt color though. Make sure you follow the flow of the skirt, the line will never go straight accross. If you want, take a color darker than the line color and in a border that is 1px wide. This gives it a little more definition. |
 |  |  |
| 4.Hide the horizontal layer and make a new layer, call it vertical or something like that. Draw a line going down, make sure to not make it straight, instead follow the folds and weight of the fabric. Repeat the lines until you are satisfied. | 5.This is what it should look like with all the layers showing. This is a zoomed up image of course. | 6. And here is what we have so far, seen at regular size. We move on to the shading. You can stop here if you are happy with it, if not, read on! |
 |  |  |
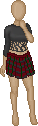
| 7. Using the burn tool, shade in some shadows, keep in mind the direction of the light. | 8.Using the dodge tool, add in some highlights, also keeping in mind the lighting. If you find that the light makes the skirt look too puffy, then try using a softer setting, or no lights at all. | 8. And here is my finished doll! Meet Aiko, a character from my universe. |